Tip
TipThe Fuel Import Fields Settings section lets you manage the fields settings for scheduling the import of the fuel transaction files.
|
Note: · You can schedule fuel import for a fuel vendor, only if you have selected the Enable Fuel Import Scheduling in the Integrations Module check box while configuring settings for fuel import. · A scheduled import of fuel transaction files cannot be performed, if the credentials of an AD FS user are used in the configuration settings of the scheduled import. |
Tip
To view the Fuel Import Fields Settings image, click the Fuel Import Fields Settings link.
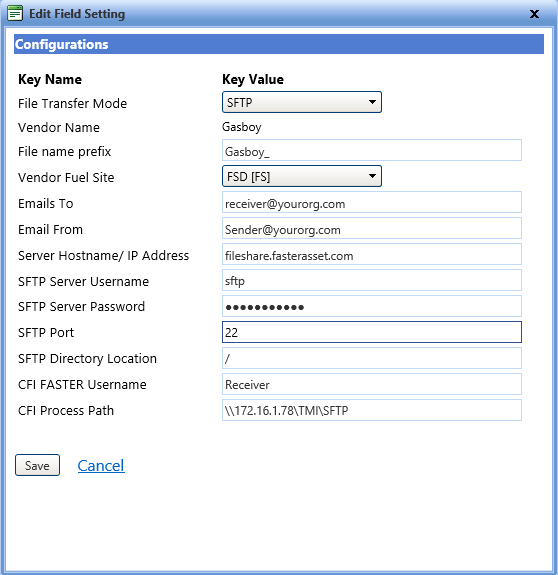
The Edit Field Settings dialog box lets you modify the configuration settings of scheduling fuel import.
Tip
To view the Edit Field Setting dialog box, click the Edit Field Settings link.
1. Click the Integrations > Fuel Import > Setup.
The Manual Entry and Fuel Import Settings page opens.
2. In the Fuel Import Fields Settings section, click Edit Field Settings.
The Edit Field Setting dialog box opens.
3. In the File Transfer Mode list, click one of the following:
o Network Location Path
o FTP
o SFTP
· If the File Transfer Mode is set as Network Location Path, it is mandatory to provide the following information:
Note: If the File Transfer Mode is SFTP or FTP this is the location from where the export files are downloaded.
· If the File Transfer Mode is set as SFTP or FTP other than the fields listed above for the Network Location Path mode, provide information for the following additional fields as well:
i. In the Server Hostname/ IP Address box, type the host name or the IP address of the SFTP or the FTP server.
ii. In the SFTP Server Username box, type the user name to connect to the SFTP or the FTP server.
iii. In the SFTP Server Password, type the password to connect to the SFTP or the FTP server.
iv. In the SFTP Port box, type the port number to connect to the server.
v. In the SFTP directory location box, type the directory location or folder path of FTP or SFTP where the export files are located.
4. When finished, click one of the following:
o Save to save the information and close the dialog box.
o Cancel to disregard any changes and close the dialog box.