Tip
TipThe Custom Report Deployment function lets you deploy custom reports and execute scripts related to these custom reports on the FASTER Web database.
Tip
To view the Custom Report Deployment page, click the Custom Report Deployment link.
1. Click the Setup module.
2. In the Administration Setup section, do one of the following:
o Click  next to the Manage Data option, and then click Custom Report Deployment.
o In the Manage Data section of Administration Setup, click the Custom Report Deployment link.
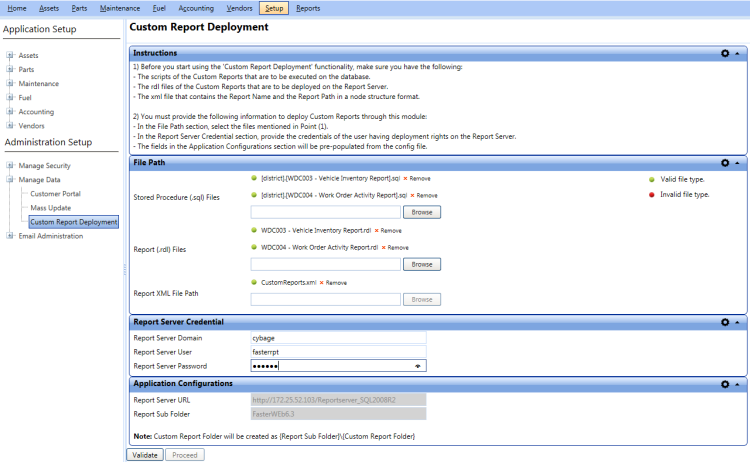
The Custom Report Deployment page opens.
In the Stored Procedure (.sql) Files box, click Browse to select a single or multiple .sql files (scripts) of the custom reports that you want to execute on the FASTER Web database.
Note: The scripts are executed in an ascending order. You must select the scripts in the order in which you want to execute them on the FASTER Web database.
In the Report (.rdl) Files box, click Browse to select a single or multiple .rdl files of the custom reports that you want to deploy on the report server.
In the Report XML File Path box, click Browse to select the CustomReports.xml file that contains the custom report’s folder format.
In the Report Server Credential section, provide the credentials of the user having deployment rights on the report server:
In the Report Server Domain box, type the report server domain name.
In the Report Server User and Report Server Password boxes, type the user name and password to connect to the report server, respectively.
|
Note:
|
FASTER Web validates the specified information and checks whether the Custom Report folder exists inside the Report Sub folder. If the Custom Report folder does not exist, a folder is created as {Report Sub Folder}\ {Custom Report Folder}.
|
Note:
|
|
Note:
By default No is selected.
|
Note: To move to the previous page, click Back.
An execution summary result containing the scripts and reports that were executed or deployed successfully or with errors is displayed.
|
Note:
|
Tip
To view the Custom Report Deployment Summary page, click the Custom Report Deployment Summary link.